

Style and Pantone with Toni & Guy
Pantone recently announced their Colour of the Year as Illuminating Yellow and Ultimate Gray, so we are bringing you a stunning step by step from Cos Sakkas and Jo O’Neill from TONI&GUY…
Style by Cos Sakkas
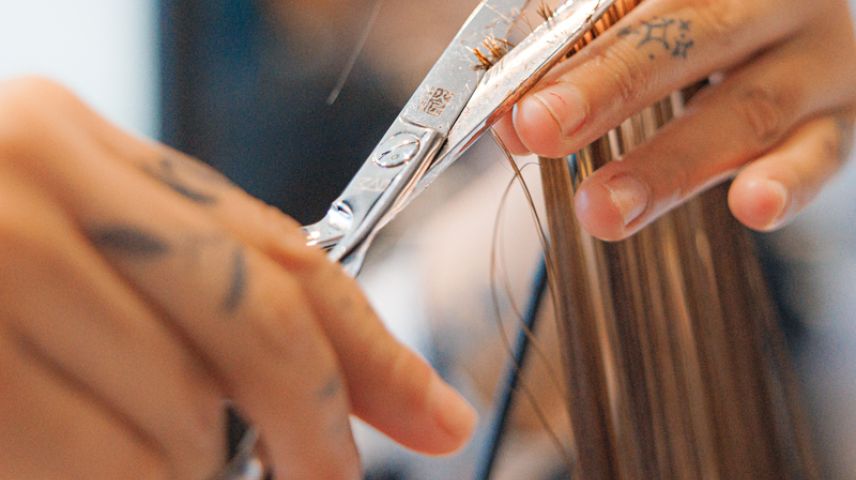
The Halo is a series of circular sections which allows the perimeter area to be worked on separately, or to be disconnected from the interior. It is the perfect sectioning technique to cut visually and allows you to see the complete outline shape build up with softness. You can, however, apply a more disciplined technique if opting to create strength.
The haircut demonstrates the versatility of technique within the Halo sectioning. The geometric lines and strong build-up of graduation through the profile contrasts the softer interior and fringe areas. The inspiration stems from the trend of raw hair cutting to create a street-cast vibe that is promoting individuality. - Head of education and international artistic director, Cos Sakkas
Step by Step
- After sectioning, starting at the back, a diagonal section is taken and cut using the Classic Graduation technique, decreasing in length, elevation controlled to build-up weight.
- Once balanced, diagonal sections are continued up towards the top of the first section, the elevation is gradually lowered and checked to create a consistent build-up of weight.
- At the front lower Halo section, a strong graphic line is created that disconnects from the fringe and back graduation, a diagonal back section is taken, and a guideline created. Sections are then directed down at a low elevation and repeated on the opposite side.
- At the centre Halo section, curved diagonal sections are worked through both sides, the hair is directed down to the original guideline to continue the build-up of weight, again precision is key. This is worked up to the top of the Halo section until the last section is reached. This will then be continued through into the upper side Halo section.
- Through the top, a loose freehand approach is taken allowing a disconnection from the structured underneath. From a profile section, a line is point cut working longer towards the front. Sections are directed to this, building up length that will give optional length within the personalising.
- The fringe area is then cut freehand using the slicing technique eliminating weight and length. This is worked to individual requirements, before slicing through the disconnections creating a proportion of balance within the shape. label.m Therapy Rejuvenating Protein Cream is applied before blow-drying; any personalising is done creating a seamless blend between the disconnections to complete the look. label.m Shine Mist is used to finish.
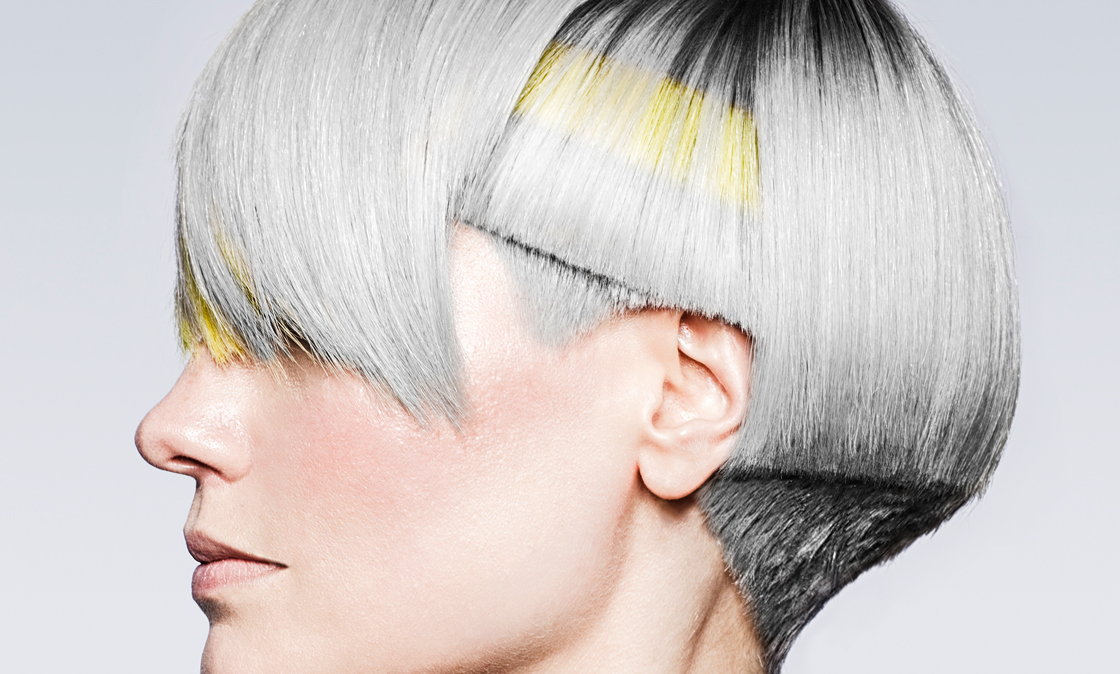
Pantone Colour by Jo O’Neill
Panelling is an internal detail that moves away from the surface colour application which was on-trend last year. This latest panelling technique focuses on internal strengths of tone creating a prominent distribution of colour where needed.
A mixture of grey hues and pops of yellow to grab our attention. The colour palette gives platinum blonds a mixture of on-trend tones with a playful juxtaposing pop of colour. - International technical education director, Jo O’Neill
Step by Step
- A large rectangle section is taken on top of the head using horizontal partings on either side from high recession to meet the radial. The sides are then sub-divided with a horizontal parting on either side to create two more rectangle sections. This parting is then continued through to the back of the head on either side creating two more sections. The first section is colour blocked with the colour Silver. Once complete, isolate with clear meche and repeat this application on the opposite side.
- A shadow root technique is applied in Masonry Grey. Firstly, applying to all the root area. Once completed the colour Silver is applied to the mid-lengths and ends. Isolate each section with clear meche and repeat application on opposite side.
- The section at the side is colour blocked with Silver. This is then isolated with clear meche. The next section, shadow root is applied using colour Masonry Grey. A panel of interior contouring is worked by applying the colour Yellow directly underneath the Masonry Grey with no diffusion. The application of Silver is applied to the ends of the hair, repeat this application on the final side. Masonry Grey is applied to the root and Silver to the length and ends.
- The section at the side is colour blocked with Silver. This is then isolated with clear meche. Shadow roots is applied with Masonry Grey all throughout the remaining section, Silver is applied through the mid-lengths and a panel of perimeter contouring is applied in Yellow. Repeat this method of application until this section is complete. Isolate with clear meche.
- To create a panel, a diagonal back parting is taken from the hairline. Shadow roots of Masonry Grey is applied, and the colour Yellow applied to the mid-lengths and ends. Isolate with a clear meche.
- In the remaining section, apply shadow root in the colour Masonry Grey and the colour Silver through to the lengths and ends. Isolating each section with clear meche.
Formulas
- Preparation: 20g Platinum Plus + 60g Platinum Nutri Developer 20 volume
- Masonry Grey: 50g Dialight 7.12 + 75g Diactivateur 9 volume
- Silver: 50g Dialight 9.11 + 75g Diactivateur 9 volume
- Yellow: 10g Dialight 9.3 + 10g Dialight Clear + 30g Diactivateur 9 volume